- The Creator's Toolbox
- Posts
- How to Remove Backgrounds in Photoshop: A Full Guide
How to Remove Backgrounds in Photoshop: A Full Guide
Mastering the Art of Background Removal in Adobe Photoshop
Steven Van
March 25, 2024 • Reading Time: 10 minutes

Removing backgrounds in Adobe Photoshop is a fundamental skill for photographers, designers, and digital artists. It allows you to isolate subjects, create composite images, or simply clean up your photos.
With Photoshop's powerful tools, you can achieve precise and professional results. This guide will walk you through various methods to remove backgrounds, catering to different needs and skill levels.
You can download Adobe Photoshop here.
Understanding Your Tools
Photoshop offers several tools and techniques for background removal, each with its strengths:
Quick Selection Tool: Best for images with clear boundaries.
Magic Wand Tool: Ideal for selecting areas of similar color with one click.
Pen Tool: Offers the most precision, suitable for intricate details.
Background Eraser Tool: Good for detailed backgrounds and maintaining the edge of the subject.
Remove Background Tool: Good for one-click background removal.
Object Selection Tool: Good for one-click object selections.
Table of Contents
Before Your Start
Step 1: Open Your Image
Start by opening your image in Photoshop. Navigate to File > Open and select your image.


Step 2: Unlock Background
If your image is locked, you’ll need to unlock it before making any changes. To do this, double-click the image layer.

Quick Selection Tool
Step 1: Select the Subject
Use the Quick Selection Tool (W) from the toolbar.
Drag over your subject to select it. Photoshop's AI will help snap the selection to the edges.
Step 2: Refine Edge
Go to Select > Select and Mask. From here, you can refine your selection. Use the sliders to adjust the edge detection, smoothness, and feathering for a more natural look.


Step 3: Remove Background
Once satisfied with the selection, invert it by choosing Select > Inverse. Then hit Delete to remove the background.


OR you can use a layer mask to non-destructively hide the background, allowing for further adjustments.
To do this, go to Layer > Layer Mask > Hide Selection.
Magic Wand Tool
Step 1: Select the Background
Choose the Magic Wand Tool (W) from the toolbar and click on a part of the background. Adjust the tolerance level to include more or less of the similar colors.


Step 2: Expand Selection
To ensure no background remnants near the subject, go to Select > Modify > Expand and expand your selection by a few pixels.

Step 3: Delete Background
Hit Delete to remove the selected background. Consider using a layer mask for flexibility.
OR you can use a layer mask to non-destructively hide the background, allowing for further adjustments.
To do this, go to Layer > Layer Mask > Hide Selection.
Pen Tool for Precision
Step 1: Trace the Subject
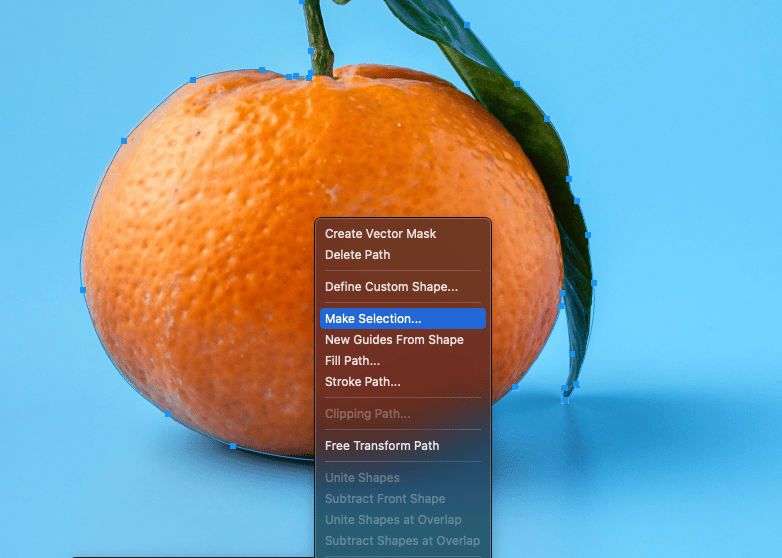
Select the Pen Tool (P) and carefully trace around the subject to create a path.

Step 2: Convert Path to Selection
Right-click the path and choose Make Selection. Adjust the feather radius for a softer edge if needed.
Step 3: Remove Background
Invert the selection and press Delete, or use a mask to hide the background.
OR you can use a layer mask to non-destructively hide the background, allowing for further adjustments.
To do this, go to Layer > Layer Mask > Hide Selection.
Background Eraser Tool
Step 1: Choose the Magic Eraser Tool
Select the Magic Eraser Tool (E) from the toolbar. In the options bar, adjust the brush size, sampling type, and limits. Make sure to adjust the tolerance as needed.


Step 2: Erase the Background
Simply click over the background you wish to remove. The tool will erase colors similar to the sampled spot while preserving the edge of the subject.

Remove Background Tool
Step 1: Choose from the Contextual Toolbar
Click the Remove Background option from the contextual toolbar.

Object Selection Tool
Step 1: Select the Object
Choose the Object Selection Tool (W) from the toolbar and highlight the object you want to remove the background from.


Step 2: Expand Selection
To ensure no background remnants near the subject, go to Select > Modify > Expand and expand your selection by a few pixels.
Step 3: Delete Background
Hit Delete to remove the selected background. Consider using a layer mask for flexibility.
OR you can use a layer mask to non-destructively hide the background, allowing for further adjustments.
To do this, go to Layer > Layer Mask > Hide Selection.
Tips for Best Results
Zoom In: Work closely on details for more accuracy.
Layer Masks: Use masks instead of deleting to allow for reversible changes.
Adjust Edges: Use Select and Mask for finer control over selections.
Conclusion
Removing backgrounds in Photoshop is a versatile skill that opens up a world of creative possibilities. Whether you need a quick fix or a meticulously cut-out subject, Photoshop's array of tools can accommodate your needs. Practice with different tools and techniques to find what works best for your project, and remember, patience and attention to detail are key to achieving seamless results.
Reply